I’ve come to an important realization recently: I prefer snacking to other forms of eating. In fact, one of the things I like most about being a vegetarian is that it’s an excuse to eat a lot of side dishes and live on those alone.

But sometimes I just want a crunchy, healthy snack that will make me feel full-ish. And that’s why I’ve always loved popcorn.

Then recently, a friend of mine was telling me about how she likes to make her own.

Make her own?? What a revelation!

Since I don’t have a microwave, I’ve been without popcorn for over a year, but being able to make it yourself? MAGIC!

So, without further adieu, here’s a simple recipe for popcorn.
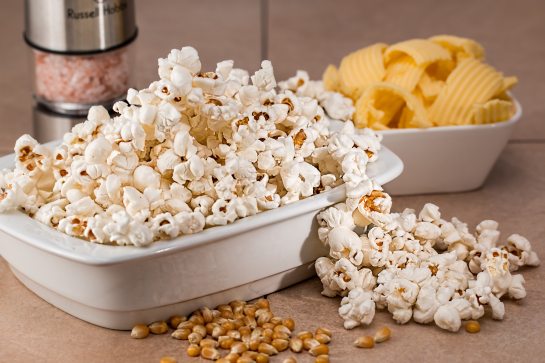
bowl-food-popcorn-37348
Source: pixabay.com

What you need:

  • 1 cup unpopped popcorn
  • 1/3 cup olive oil

What you do:

  1. Put the oil in a large pot (one that has a lid)
  2. After about 5 minutes, add a couple of kernels of popcorn and wait for them to pop (that’s how you know your oil is warm enough)
  3. Add the rest of the popcorn kernels, and cover the pot with a lid
  4. Cook until you notice the popcorn has stopped popping (about 5 minutes)
  5. Season and enjoy! Need some seasoning ideas besides just salt? Here are a few to get you started.

Messiness: Since there’s no prep, and everything is contained in the pot, there’s really no mess at all.  You have to use the pot though, so it does mean a little more cleanup.

Budget: CHEAP! You can buy the popcorn kernels from the bulk bins to save on them. For reference, I’ve been paying $2.30/lb at Whole Foods. Much cheaper than a box of microwave popcorn.

Simplicity: SO SIMPLE. And as you know, I love recipes that are simple and easy to customize according to what you’re craving.

Delicious scale: Amazing! It tastes fresh, and the olive oil gives it a buttery flavor without all of the extra, well, butter.

A few years ago, Lemon Bars were the one thing I continued to fail at making. Lately, my nemesis has been vegan eggs. I’m only a vegetarian, but try to eat vegan when possible. My biggest problem has been figuring out how to make my own vegan eggs without tofu (not for any reason other than I’m not a huge fan of tofu).

Luckily, I was able to modify a recipe I found to use things I already had in my kitchen. Bonus: I got to use a lot of the ingredients I resolved to use this year. Honestly, after no less than 20 failed (and some gross) attempts at making vegan eggs, I’m happy to say it finally worked.

The original recipe can be found here, and my modified version with more common ingredients is below:

What You Need:

  • Besan/Gram.Chickpea powder (2 TBSP)
  • Ground flaxseed powder (2TBSP)
  • Nutritional Yeast (1 tsp)
  • Turmeric (1/4 tsp)
  • Minced garlic (1 clove)
  • Black pepper (to taste)
  • Salt (to taste)
  • Water (7 TBSP)
  • Oil (1 tso)
  • Salsa (or any combo of breakfast veggies that you like)

What You Do:

  1. Mix the powders, yeast, turmeric, garlic, black pepper, salt and water. The mix will be stuck together and malleable once it’s mixed completely
  2. Warm the oil in the pan and add the salad and/or vegetables; saute for about 5 minutes
  3. Add the mixture to the oil and flatten it so it cooks through faster
  4. When it’s a bit firm, turn it over and break up the pieces so they look like scrambled egg bits
  5. Cover the pan and let cook for 2-3 minutes
  6. Stir the “eggs,” continuing to break it up to give it an eggy texture
  7. Once it starts crisping, the eggs are done

Messiness: I was pretty surprised at how not messy this is, especially considering that it has so many powders. If anything, it’s just that needing a pan cover adds one extra dish to wash.

Budget: When you factor in the seemingly endless batches of eggs that you can make with these, it costs such a small fraction of buying regular eggs or egg whites. I usually buy my flour and spices at the local Indian market.

Simplicity: I didn’t trust my success the first time around, because I’d messed up so many recipes before this one. So, I tested this process and made a second batch. It works! And the ingredients already on-hand, which made it even simpler.

Delicious Scale: They tasted like eggs! So, if you think eggs are delicious, then you’ll like these. The color and texture shocked me at how close to the real thing they were and they didn’t taste like either nothing, cardboard, or weird powders put together (all of which have been my previous experience. I’d give them an 8/10 overall.

I’m a big fan of eggrolls. Basically, I’m a big fan of any food that makes it easier for me to eat utensil-free. And eggrolls are that.

So, I decided to try my hand at chipotle southwest eggrolls. As with a lot of the recipes I publish here, they’re really customizable, depending on what “southwest” means to you. Lose the black beans and add some avocado, or mix in some onion for the heck of it. The world is your oyster (maybe let the oysters sit this one out though).

But I will insist on getting chipotle chilis in adobo sauce. Those things really make or break a recipe. And frankly, I made a few eggrolls without them and they were so boring.

southwest chipotle eggrolls vegetarian


What You Need:

  • 1 package of eggroll wrappers (near the tofu and fake meat in Ralphs)
  • Shredded lettuce
  • Can of corn
  • Can of black beans
  • Can diced tomatoes
  • Chipotle chilis in adobo sauce
  • Cilantro

What You Do:

  1. Put the lettuce in a covered pan and let some of the water cook out of it. If it’s too wet, it can make the eggroll soggy
  2. In a bowl, mix in the corn, black beans, the tomatoes (make sure to drain the can first), and the chopped chipotle chilis
  3. Place a small amount of the mixture in the middle of each wrapper (the amount shown in the picture, give or take a bit)
  4. Add fun extras like a bit of hot sauce, queso, more sauce from the chilis, sliced avocados, go wild! Make sure to add a little salt at least
  5. Wrap up the eggroll, folding one corner up to the middle, then the side corners over it, and sealing the roll with the top corner. You can use a bit of water on the wrapper to seal it shut
  6. Bake according to the directions on the wrapper (I know there are different brands out there and don’t want to lead you astray).
  7. Make sure to turn the rolls halfway through cooking so they cook on all sides
  8. Enjoy!

Messiness:

This is very messy. I even tried to keep one hand clean so that I could more easily maneuver the eggroll wrappers and not accidentally double up. But, it only takes about 20min to get them into the oven, and after that, I’ve got a day’s worth of eggrolls ready to snack on while I watch football.

Budget:

These are pretty cheap! Other than the eggroll wrappers (Which I believe were $3), I got the rest of my ingredients at the 99 Cent store.

Simplicity:

As far as recipies go, this is a  fairly simple one. Other than maybe burning them, it’s hard to make a bad eggroll.

Delicious Scale:

What I love most about southwest eggrolls specifically is that there’s usually a lot of extra mix left. This is great for a leftover taco salad (just set aside some of the lettuce before steaming it).


produce

I’m a picky eater. I always have been, but I’d like to think I won’t always be that way. To combat this, I’ve tried a few strategies over the years. For example, every season, I try to pick one seasonal food and work it into the foods I cook.

By doing this, I’ve learned I LOVE red peppers and broccoli, and that I’ll probably never warm up to green peppers or yellow onions. It also forces me to get creative with how I cook the foods, so they don’t get boring.

However, there are some foods that keep recurring in recipes I look at, so I’m sensing a trend. This made me decide to make some specific New Year Resolutions when it comes to my food. Here are five ingredients I’m planning to mix into my diet more often:

1. Nutritional Yeast

This ingredient, aka “nooch,” has weirded me out for a long time. I’ve actively stayed away from recipes that call for it simply because I don’t understand it. But that’s why I’ve stayed away from most foods in my life. So I decided this is the year I’m going to start mixing it into more of my food. I’m a vegetarian but have been trying to cut animal products out of my diet more and more. The problem is that I love cheese. Since nutritional yeast keeps showing up as a viable replacement, I’m willing to give it a go.

2. Chipotle Peppers

Ever since I tried the Love and Lemons roasted cauliflower tacos, I’ve had a love affair with chipotle peppers and their canned adobo sauce. The problem is that I don’t quite know what to do with it. Outside of that super clever fruity yogurt and chipotle adobo blend, I pretty much just add it to my eggs or chili. This year, I really want to take the time to explore the wide world of chipotle peppers and see what other magic they hold.

3. Besan (or Gram) Flour

This is another ingredient I’ve dabbled with. I’ve made flatbread and even an egg substitute (which ended up tasting like flatbread). It’s such a popular ingredient in other cultures that I have to think there’s some magic in besan flour that I just haven’t quite unlocked yet.

4. Spirulina and Chlorophyll

I know these are two different ingredients, but they’re kinda the same, right? By adding these, what I’m getting at is that I want to add more healthy, nutrient-dense greens to my life. I’m a frequent Pressed Chlorophyll water drinker, and I can’t help but think that it’s cheaper if I just make my own. As for spirulina, give me all of those antioxidants! I’m 30, and I’m starting to notice my skin just isn’t what it used to be. So I figure that squeezing in a few extra healthful spoonfuls of these can only help, right?

5. Flaxseed

I have tried and failed to add flaxseed into my diet on many occasions. I went through a phase where I successfully added it to my smoothies every day, but that smoothie phase was short lived. This year, especially since I’m trying to cut out more eggs, I’m going to work really hard to make this flaxseed dream a reality.

If you have any recipes using these ingredients, I’d love to give them a try! Please share in the comments so we can all enjoy 🙂

Happy New Year!

making tacos tortillas lentils

Photo: Lionel Gustave @lionel_gustave

I know what you’re thinking: Two ingredients? Where’s the rest of the taco?

So, I’ll be upfront in addressing that this is about making the vegetarian taco “meat” But to set up the rest of the taco bar, add as many or as few of these things as you’d like:

    • Shredded lettuce
    • Diced tomatoes
    • Diced onions
    • Shredded cheese (or crumbled cotija cheese… or both)
    • Salsa
    • Taco sauce
    • Sour cream
    • Guacamole
        + tortillas!

Hard, soft, folded, flat, bring them on!

Ok, now that’s out of the way, let’s make this as simple as possible:

What You Need:
2 cups cooked lentils (cook according to the package)
1 packet taco seasoning

What You Do:
Cook the lentils
Add the seasonings
Assemble the tacos

That’s it! And before you ask, “What the heck did I just read,” let me explain. When I started cooking for myself, I literally needed directions for everything, including little things like, “lentils can be combined with pre-bought spice packets.” For some reason with cooking, it’s really easy to complicate things.

For example, could you go out and buy each type of spice in those packets, measure out the exact amount in each, and use that? Sure. But why? One tiny packet should make you roughly 2 cups of cooked lentils. That’s a lot of taco filling!

And if you’re a person who was like me and made cooking a very precise, semi-stressful event: it’s ok. This is just cooking, not baking.

wink michael scott gif

Messiness: I gotta be honest, taco bars can get pretty messy, so use some cheats. Get pre-shredded lettuce and canned diced tomatoes. It’s a taco, you can only go so wrong with the ingredients.

Budget: I found all of these items at my local 99 Cent store, so you can make roughly 20 tacos (give or take 5) for around $10. That’s about $0.50 a taco. Cheaper than the truck, right?

Simplicity: This is kinda the whole point of the recipe: keep it simple. Growing up, our mom fried all of our taco shells and it felt like the fanciest, most labor-intensive thing, and it can be that way. But there are ways to make everything taste just as good while cutting a few corners.

Delicious Scale: If you give taco meat a 10/10, then look forward to more of the same. Lentils have a similar texture to ground beef and they absorb flavor well, too.

Taylor Kiser @foodfaithfit

We’ve all been there: you took time out of your morning to construct the perfect salad that will get you through your workday and all of the way to dinner. But then, when you go to eat the salad later, the dressing has soaked into whatever was at the bottom and ruined everything. 

Or maybe you took your salad dressing to work, totally meaning to bring it back later for dinner, but forgot the bottle, then dinner is ruined and it’s all your fault for trying to be healthy.

Now, there are ways around this, like strategically layering things in a mason jar, but what if your salad — like my favorite greek salad — has no ingredients that will sufficiently buffer the dressing? Then you just end up eating a sandwich or a bunch of snacks that are nowhere near as good for you as that salad.

So, I started looking around for salad dressing containers.to take to work with me, and I found some good affordable options I thought were worth sharing. Of course, there’s a small stainless steel container for $35 for people who just like to spend money because why not, but for the rest of us, here are some sensible options to make sure your work-salad is never naked again:

Sistema® 4-Piece Dressing Pots To Go Container Set — $4.99


Evriholder Dressing to Go Salad Dressing Container, 2-ounce — $6.25


YINGGG Squeezy Portable Salad Dressing Bottles — $9.99


3 Pc Round Leakproof Salad Dressing and Condiment Locking Lid Airtight Container to go 3 oz capacity — $7.95


Oxo Good Grips® On-The-Go Silicone Squeeze Bottle — $8.99

Unfortunately, I’ve noticed there’s a serious lack of cute to-go containers for dressing. If you have any suggestions, please send them my way! Because I’d much rather pour my vinaigrette out of a dinosaur shaped bottle than a tiny, yet very stackable cylinder.

Crispy quinoa recipe

I’ll admit it: salad is just an excuse for me to eat croutons.

I love bread, and croutons and everything carb-related, but obviously they’re not the best choices when you’re trying to lose weight and/or get more protein in your diet. So, what if you could combine them?

I recently fell in love with Mendocino Farms’ caesar salad (with the lemon parm dressing), and the kicker for me is the crispy quinoa. They’re like tiny crunchy croutons that are good for you. So, I started making them at home and now I put that shit on everything. It’s really simple too!

What You Need:

Quinoa

Non-stick spray

Your favorite seasonings (optional) like garlic powder, smoked paprika, etc.

What You Do:

Preheat oven to 400 degrees

Cook the quinoa according to the directions on the package (Click here if you need some tips)

Spray the nonstick spray (or use some oil) and put a flat layer of cooked quinoa on it

(Optional) Sprinkle your favorite seasonings on the quinoa

Bake for about 30 minutes, checking often to flip quinoa and to make sure it doesn’t burn

You’ll know it’s done when it’s reached your personal level of ideal crispiness

Messiness: I’ll be honest, it’s a little annoying that you have to cook the quinoa then bake it because more dishes!), but it’s worth it!

Budget: Typically, you can get the best deal on quinoa if you buy it from the bulk bins. A little bit goes a long way, so you shouldn’t need more than a few dollars worth of quinoa.

Simplicity: It’s about as easy as homemade croutons, but healthier and easier to store since quinoa is much smaller.

Delicious Scale: If you’re a carb fiend, then this is a great way to get your fix and make salads tastier. Even if you’re not, a little crunch never hurt anyone. 🙂

This post isn’t so much about a recipie as it is about a cooking tip I realized this past week.

Did you know you can stuff peppers with premade contents???

I know, this sounds super remedial, but if you’re like me, then sometimes you get into this mental rut where cooking is an all or nothing affair. But that’s not always true!

Case in point is the stuffed red pepper I made this weekend (not the pepper pictured above — shoutout Wikimedia commons, because I’m still garbage at food pics). It had brown rice, lentils, garbanzo beans, peas, edamames, carrots, and other chopped goodness in there. Sounds like a lot of work, right? Making the rice and lentils, and chopping the carrots. WRONG!

I cheated, used the contents from one of those instant steamer bags, and voila!

Seriously, that’s it. I cut the top off the pepper, emptied it, sprinkled some cheese in the bottom, added the frozen contents from the bag, stuffed some more cheese in the top, and baked it (375 degrees for 30ish min).

See? How easy is that?

Then I put the rest of the bag’s contents in a pan, steamed it with a little water, and dinner was done.

It may seem like such a straighforward tip. But for me, it was a revelation.

If you have any tips like this, I’d love to know!

asparagus pita pizza

I’d have to say that pita pizzas are a big staple in my diet when I’m trying to lose weight. They’re simple, satisfying, portion controlled, and can be as healthy as you want to make them… and as fancy too.

But what happens when you’re out of pizza or spaghetti sauce?!

That happened to me recently, and I had to get creative. I’m in a pretty big sriracha phase, so I thought, why not try and find a way to make that work? It was pretty perfect. With that said, if you’re not a spicy fan, you can easily make this pizza with spaghetti sauce too (just swap the sauce of your choice when you read about the oil and sriracha).

What You Need:

  • Sriracha
  • Olive oil
  • 1 pita
  • Asparagus (try to pick some on the smaller side so they don’t take as long to cook)
  • Tomatoes (sliced)
  • Spinach
  • Shredded/grated mozzarella cheese
  • Feta (optional)

What You Do:

  1. Cover the pita in a thin layer of oil.
  2. Spread as much sriracha on your pita as you can handle (I like to make fun designs because I’m a basically an adult who refuses to grow up)
  3. Layer spinach leaves on the sauce
  4. Cut the asparagus to that it’s the size of the pita, then arrange as you like with the tomatoes
  5. Sprinkle a layer of cheese over your pita (the more the better imo, but you can use as much as you want)
  6. Bake for 10-15 minutes at 350 degrees either on the rack itself or on a baking sheet

Enjoy!

Messiness — not messy at all… unless you get into a food fight halfway through in which case all bets are off.

Budget — Depending on what’s in season, you can make this all for under $8 I found all of the ingredients at my local 99 Cent store, which puts each pizza at about $1-2/each.

Simplicity — It’s pretty darn simple. A bit more work than putting a premade mini pizza in the oven, but much fresher and healthier.

Delicious Scale — Frankly, I was shocked how much I liked sriracha in place of regular sauce. Together, these flavors reminded me of the Yardhouse’s thai chicken pizza… minus the pizza.

Now that I don’t have a job that begins at 6am, I’m trying to adopt a lifestyle that lets me get my important things done in the morning, and then I can relax at night. For me, this typically means working out, writing for 30 minutes in the morning, and squeezing in 10 minutes of yoga meditation. What’s weird though, is that since I’m trying to achieve so much in a matter of hours, I find myself shortchanging my breakfast.

I’ll grab a drive-thru Starbucks spinach feta wrap, or heat up some oatmeal at work, but truth be told, I’m usually starving by then.

So, I needed an easy solution to having a healthy breakfast without it cutting into my new routine.

My answer was simple. Scramble eggs + toppings in a coffee mug, microwave it for 1-2 minutes, which is as long as I like my English muffins to toast. 2 minutes and 30 seconds later, you’ve assembled a scrambled egg sandwich. Healthy, portable, and the cleanup is just your coffee mug.

breakfast sandwich

Here’s how to do it:

What You Need:

1-2 eggs (I do 1 egg 1 and 1 egg white)

Cheese

Tomatoes (chopped)

Spinach

Salt, pepper, etc. (whatever seasonings you like in your scrambled eggs)

1 English muffin (or bagel)


What You Do:

Crack the eggs into the mug and mix scramble with a fork

Add in the toppings and seasonings; mix together

Microwave for 1 minute; if it doesn’t look cooked, continue cooking for 30 seconds at a time (after you do this twice, you’ll get a sense of how long it will take)

Toast your English muffin/bagel

When the eggs and muffin are done, assemble into a sandwich


TIP: Wrap it in foil to keep it warm and portable if you’re on your way out the door


Messiness:

Not messy at all, especially since it’s all contained in the mug.

Budget:

Really cheap. It’s the same cost as scrambled eggs, or anything else you’d eat for breakfast. And over the course of a week, it’s cheaper than grabbing a fast food breakfast sandwich.

Simplicity:

It’s as hard as making mac’n’cheese in the microwave. If you’ve done that, you can easily make this. You can also play with your toppings. Add an avocado when you put the sandwich together, change up the cheese you use, add chunks of ham. There are lots of options for you.

Deliciousness:

I happen to LOVE scrambled eggs and breakfast sandwiches in general, so for me, this is about as good as it gets.
And, if you want to make it low-carb, just don’t use the bread, and eat your eggs right out of the mug. It’s completely self contained.